IP spoofing is the solution when performance testing requires multiple virtual users to use multiple IP addresses from a single host machine (load generator) to keep the web server from blocking those virtual users. Also IP spoofing is needed when the hardware configuration under test balances load across a “farm” of several (web or database) servers. IP spoofing enables each load generator to “spoof” the server into thinking it is using many different IP addresses.
IP Spoofing Configuration
HPE LoadRunner includes the IP Wizard program that you run on each load generator to create multiple IP addresses. You add new IP addresses to a machine once and use the addresses for all scenarios.
Invoke the IP Wizard on the load generator by going to Start menu then HPE Software then IP Wizard.
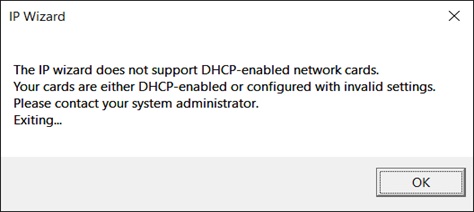
Note: You need to turn off DHCP on your network card before you can use the IP Wizard. If DHCP is on, you will receive the following message when you try to start the IP Wizard.
Disabling DHCP in Windows 8 and Windows 10
- On the Windows desktop, press the Windows key + X on the keyboard to open the Power User menu.
- Select the Network Connections option.
- You should see at least two types of network connections: Ethernet and Wi-Fi. Double-click the active network connection.
- On the network connection status window, click the Properties button.
- Click on the Internet Protocol Version 4 option and click the Properties button. You may need to perform the following steps for the Internet Protocol Version 6 option as well.
- If you want to enable DHCP, make sure Obtain an IP address automatically is selected, as well as Obtain DNS server address automatically.
- If you want to disable DHCP and enter your network settings instead (required to use IP spoofing), select the Use the following IP address option and enter values for IP address, Subnet mask, and Default Gateway. Also, select the Use the following DNS server address option and enter a value for Preferred DNS server. You can also enter a value for Alternate DNS server if you want.
Disabling DHCP in Windows 7
- Open Control Panel.
- Click on the Network and Sharing Center icon.
- In the View your active networks section, click the Local Area Connection link.
- In the Local Area Connection Status window, click the Properties button.
- Highlight the Internet Protocol Version 4 option and click the Properties button. You may need to perform the following steps for the Internet Protocol Version 6 option as well.
- If you want to enable DHCP, make sure Obtain an IP address automatically is selected, as well as Obtain DNS server address automatically.
- If you want to disable DHCP and enter your network settings instead, select the Use the following IP address option and enter values for IP address, Subnet mask, and Default Gateway. Also, select the Use the following DNS server address option and enter a value for Preferred DNS server. You can also enter a value for Alternate DNS server if you want.
If DHCP is off, you will see the following window when you Invoke the IP Wizard from the HPE LoadRunner Program Group.
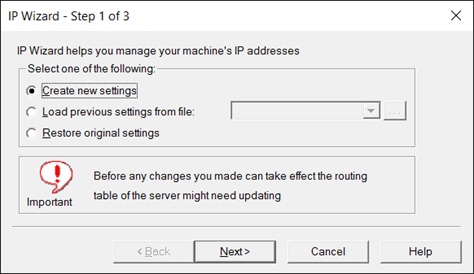
- If you have an existing file with IP address settings, select Load previous settings from file and choose the file.
- If you are defining new settings, select create new settings.
- Click Next to proceed to the next step. If you have more than one network card, choose the card to use for IP addresses and click Next.
The optional Web server IP address step enables the IP Wizard to check the server’s routing table to see if it requires updating after the new IP addresses are added to the load generator.
- To check the server’s routing table directly after adding the addresses, enter the server IP address. See Updating the Routing Table for more information.
- Click Next to see a list of the machine’s IP addresses. Click Add to define the range of addresses.
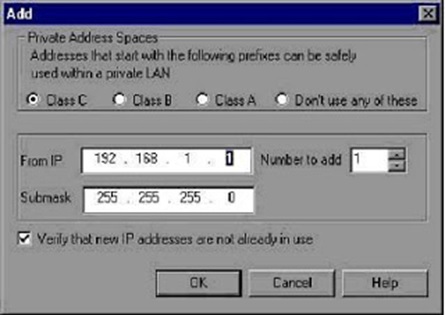
IP addresses include two components: NETID and HOSTID. The submask determines where the NETID portion of the address stops and where the HOSTID begins.
- Select a class that represents the correct submask for the machine’s IP addresses.
- Specify the number of addresses to generate in the Number to Add field.
- Check the check box Verify that new IP addresses are not already in use to force the IP Wizard to check the new addresses. The IP Wizard will only add the addresses not in use.
- Click OK to proceed.
- After the IP Wizard creates the new addresses, the summary dialog box lists all the IP addresses. See the diagram below.
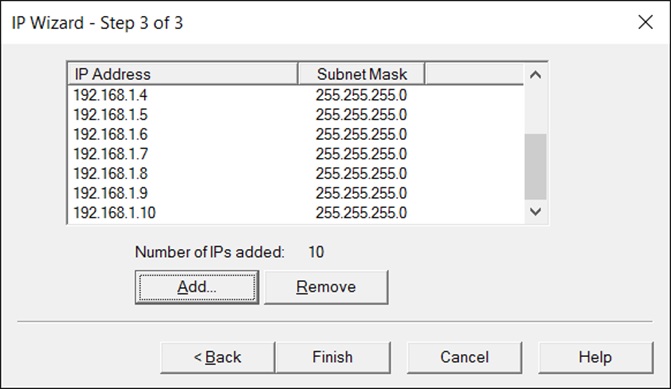
Click the Finish button to exit the IP Wizard. You should see the IP Wizard Summary dialog. Example of an IP Wizard is displayed below.
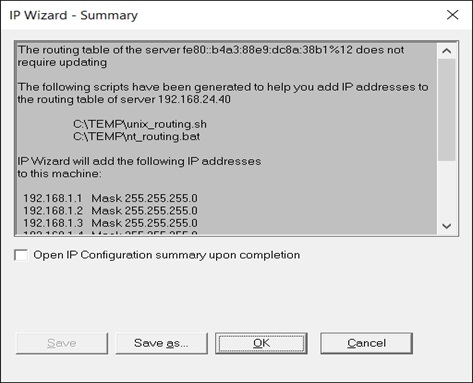
- Please see the address of the .bat file in the screen above and remarks (REM) about updating the routing table for information about using the batch file to update the routing table, if necessary.
- After you update the routing table, check Reboot now to update routing tables to initialize the Windows device drivers with the new addresses.
- Click OK.
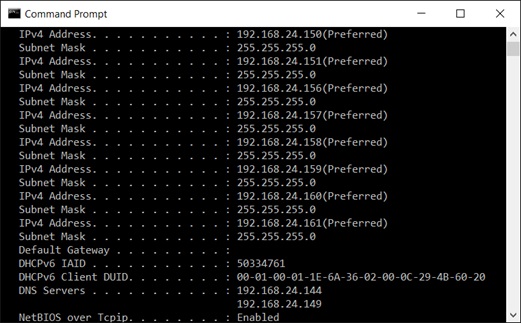
- Run ipconfig/all and you should be able to see all the new IP addresses. See the following example that shows the list of IP addresses that have been added.
Updating the Routing Table
When the client machine has new IP addresses, the server needs the addresses in its routing table, so that it can recognize the route back to the client. If the server and the client share the same netmask, IP class, and network, the server’s routing table does not require modification.
Note: If there is a router between the client and server machines, the server needs to recognize the path through the router. Make sure to add the following to the server routing table: route from the Web server to the router and routes from the router to all the IP addresses on the load generator machine.
- Edit the batch file that appears in the IP Wizard Summary page. An example .bat file is shown below.
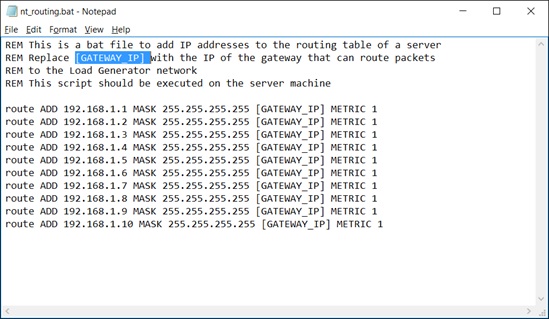
- For each occurrence of [GATEWAY_IP], insert your IP address instead.
- Run the batch file on the server machine.
Enabling IP Spoofing in HPE LoadRunner and HPE Performance Center
Enabling Multiple IP Addresses from the HPE LoadRunner Controller
After you define multiple IP addresses, you need to set an option to tell the controller to use these IPs. To do that, follow these steps:
- In the Controller Design view, select Scenario then Enable IP Spoofer. Note: You must select this option before connecting to a load generator.
- Enable Expert Mode (in the controller, click Design Tab, Tools menu then click Expert Mode).
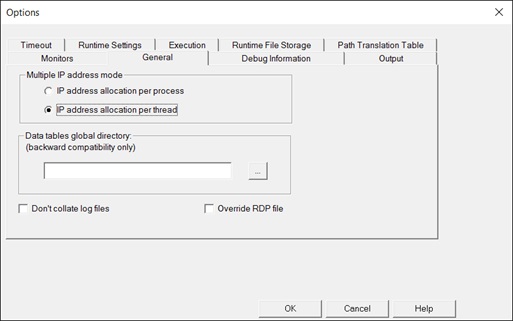
- Under the General Options of the Controller Expert Mode, specify how the controller should allocate the multiple IP address mode. To allocate an IP per thread, select IP address allocation per thread.
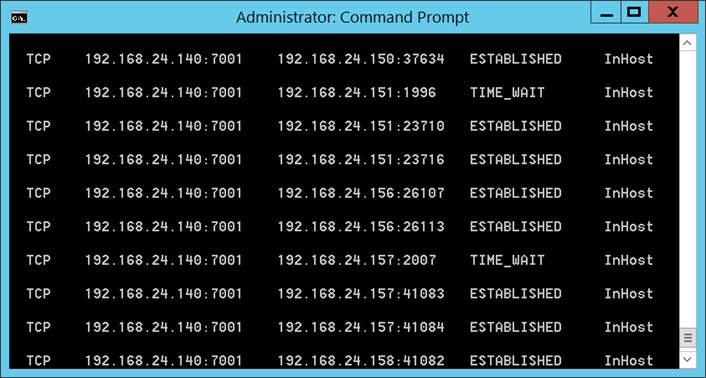
Note: If you run HPE LoadRunner with all settings that have been listed above and then you run the netstat -nt command on the server machine/command prompt, you should see that all IPs are being used by HPE LoadRunner (shown below).
Enabling IP Spoofing from Performance Center
After you define multiple IP addresses, you can enable IP spoofing for a load test. Note: You must enable IP spoofing before running a load test.
To enable IP spoofing from the user site:
- On the HPE Performance Center left menu, select Load Tests then Manage. The Load Tests page opens, displaying all the load tests in the current project.
- Click the load test for which you want to enable IP spoofing.
- On the Load Test configuration page that opens, click the General tab.
- Under Advanced, select Enable IP Spoofer.
- Click Save to save your settings.