Summary
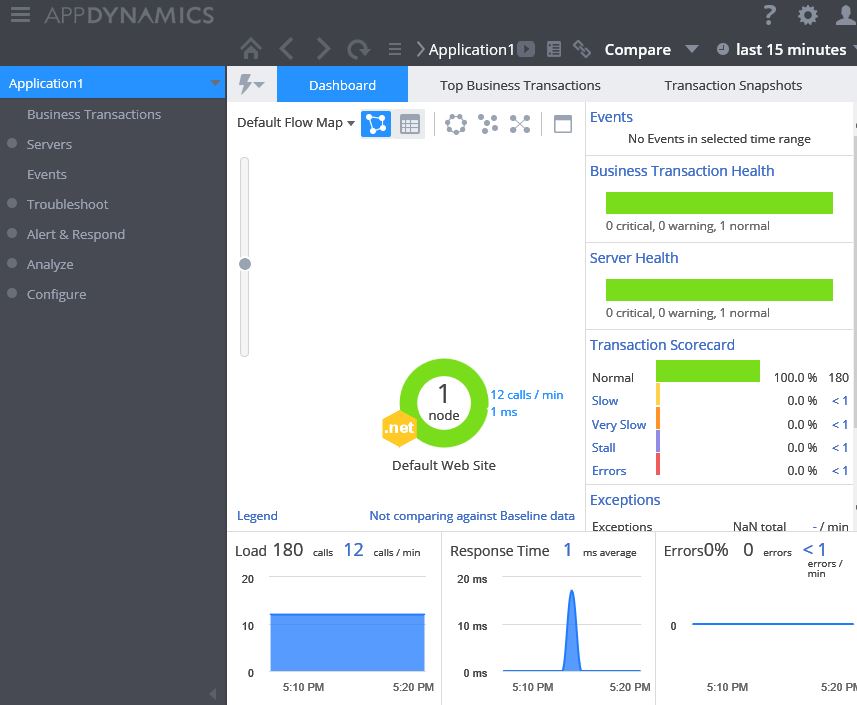
AppDynamics provides a 15-day free trial so you can test out its features on a self-host basis. This article is going to give you the steps needed to download the AppDynamics Agent and the AppDynamics Controller and begin monitoring an application on the Windows platform immediately. If you don’t already have an application to monitor, we will create a simple one from scratch for demonstration purposes. The following is the Default Flow Map you will see after following the steps:
Free Trial And Pricing
Details can be found at AppDynamics Pricing, but below is a summary of how the free trial works:
- Starting with a 15-day free trial, all AppDynamics product modules are available in AppDynamics Lite – Free Forever, and AppDynamics Pro Editions. The only difference between Lite and Pro is that Lite is limited to one of each type of agent (.Net, JVM, PHP, Node.js), and Lite will only retain your data for a 24 hour window, rather than forever.
- AppDynamics Application Performance Management is priced by agent units. Agents are injected into your application code to allow you to monitor your business transactions. In Java, you’ll need one unit for each JVM. In .NET, one unit for the .NET CLRs running on a Windows OS. In PHP, one unit for each web server. In Node.js, one unit for every 10 Node.js processes.
- Application Performance Management Free Trial
- 5 agent units of APM – Java
- 5 agent units of APM – .NET
- 5 agent units of APM – PHP
- 5 agent units of APM – Node.js
Server Monitoring
- 20 units of Machine Agent
SaaS Or On Premise
AppDynamics is flexible in its architecture, which allows you to choose between SaaS, On Premise, or both.
SaaS
SaaS is the simplest deployment scenario because you don’t have to store any of the application telemetry data locally; AppDynamics hosts it for you in Amazon EC2 cloud services for free. If you choose SaaS we will only need to install a single AppDynamics component, the Agent. When we sign up for the 15-day free trial we will be provided a URL to the cloud location. If this is the option you choose then skip the section on the AppDynamics Controller Download and AppDynamics Controller Configuration.
On Premise
If you want to store your data on premise rather than the cloud for security, bandwidth, archival, or architectural reasons, it is your choice. In this configuration we will need to install the AppDynamics Controller before we configure the Agent. It will take about one hour to download and configure the controller.
AppDynamics Sign-up
If you haven’t signed up for the free trial go to AppDynamics.com. After signing up you will get an email with the SaaS Controller URL with an access key, account, and user name and be directed to a page similar to this:
Let’s get started with your AppDynamics trial! Which deployment would you prefer?
- SaaS – We host your performance data
- Download On-premise – You host your performance data
AppDynamics Controller Installation (Optional)
This is optional as we can use the SaaS/Cloud version where a local controller won’t be required.
- If you choose On-Premise after signup you will receive a “Welcome to AppDynamics Pro On-Premise Trial” email. Use the links in the email to download the AppDynamics Controller.
- If you are still at the web page that you were directed to on completion of the sign-up, similar choices will be presented for operating system and architecture.
- The controller download will be a zip file and have a name similar to controller_64bit_windows-v.v.v.v.zip (where the v.v.v.v will be the latest version) containing the following two files:
- controller_64bit_windows-v.v.v.v.exe
- license.lic
- Save the zip file and extract the .exe and .lic files to your local disk.
- Run the installation executable
- Very detailed installation instructions are available at docs.AppDynamics.com, but below I summarized the installation procedure.
- Step through the installation and accept the defaults. There following are the only 3 prompts where you will need to make a choice:
- Tenancy Mode – Choose “Single” tenancy mode for most circumstances.
- Controller Performance Profile (Sizing) – Choose “Demo” unless you plan to convert this to a permanent controller later.
- High Availability Configuration – Choose “Not Applicable (Not HA Enabled)” unless you plan to convert this to a permanent controller later
- The files will then be extracted on your AppDynamics Controller host. This can take up to an hour to extract and start the controller.
- If there are any Windows Firewall prompts for Java, MySQL, or AppDynamics Controller, allow access appropriately.
- Copy the license provided in the zip file into the following directory:
- <CONTROLLER_INSTALLATION_HOME>\license.lic
- For example: C:\AppDynamics\Controller\license.lic

- Log into your controller with the credentials you set during the Installation Wizard.
- http://<HOSTNAME>:<PORT>/controller
- For example: http://localhost:8080/controller
- Note – if you get a license error in the controller window, make sure the license.lic file is in the same directory as the controller installation.
- If you have any problem accessing your AppDynamics Controller, you can diagnose the issue by going to the Windows Command prompt and changing to the C:\AppDynamics\Controller\bin directory. Located there is the logs files and command files to start (startController.bat) and stop (stopController.bat) the controller.
- Manage your AppDynamics subscription(s) and profile using the link below.
AppDynamics Agent Installation (Required)
Very detailed installation instructions are available at docs.AppDynamics.com, but below I summarized the installation procedure.
With your email with the SaaS Controller URL with an access key, account, and user name you can begin the Agent installation.
The agent is required to be installed on the application server you want to monitor. There is an Agent Download Wizard that can be used, or just follow these steps:
- http://www.appdynamics.com/support
- There are three sections, 1) Saas Customers, 2) On-Premise Customers, 3) Download Agents. Scroll down to Download Agent Agents and where you see Download .NET App Agent click on 64-bit.
- Save dotNetAgentSetup64-v.v.v.v.msi to your local disk.
- Step through the installation and accept the defaults.
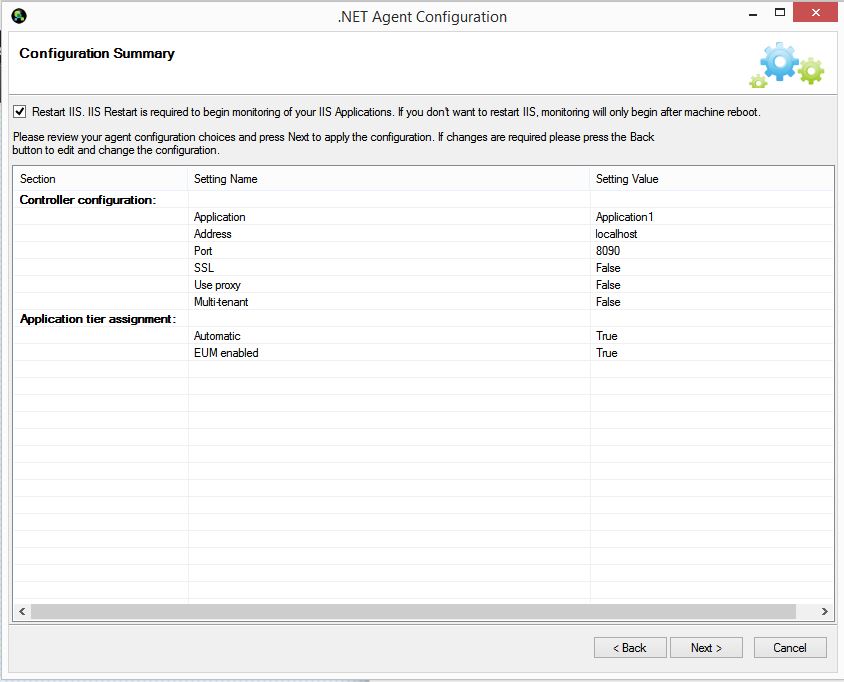
AppDynamics Agent Configuration
The AppDynamics Agent Configuration can be run as many times as needed, it is not a run only once type of application. For example if you install another application in the future or want to re-configure the Agent, you just re-run it.
- From the Start menu load AppDynamics Agent Configuration
- Accept the defaults until you get to the Controller Configuration page
- If your are using an On-Premise controller enter the following:
- Server (Name/IP): localhost or the machine name
- Port Number: 8090
- If you are using SaaS, enter the server and port sent to you in the email from AppDynamics
- Click “Test Controller Connection” to verify.
- On the Application Configuration page enter an application name such as “Application1”, or whatever you choose, then choose Next.

- On the “Assign IIS Applications to Tiers” page choose the default of “Automatic”, unless you want to specify individual applications to monitor or not to monitor
- W3SVC will be recycled and it will find all hosted IIS applications
- Go to the SaaS Url provided by AppDynamics, or http://localhost:8090/controller if configured as On-Premise
- There should now be an application named “Application1”, or whatever you named it.
Demo Application
If you already have an existing .Net application to monitor, you can skip the rest of the sections as you should now be ready to monitor it. Otherwise, follow the rest of the steps.
Windows IIS
You may have already configured IIS on your computer, but if you haven’t follow this:
- Go to Control Panel\Programs\Programs and Features and then select “Turn Windows features on or off”.
- Check .Net Framework 3.5, 4.5, and Internet Information Services.
- Under IIS make sure World Wide Web Services is checked as well.
- Click Ok and it should install.
Microsoft Visual Studio
If you already have Microsoft Visual Studio installed, you can skip this section. Any version of Visual Studio will work.
Install Visual Studio Ultimate 2013
- http://www.visualstudio.com/en-us/downloads/download-visual-studio-vs.aspx
- Choose No optional components
- Uncheck Select All
- Cancel license Key
- Choose Visual C# Development settings
- Start Visual Studio
Create the Visual Studio Application
We will create a Visual Studio Web Site that just displays the time on the default page.
Create a Web Site
In the Visual Studio Ultimate 2013 IDE do the following:
- File, New, Web Site…
- Visual C#, ASP.Net Empty Website
- Web Location
- Choose File System. The location for the project can be the default location, and this is not where the site will be hosted when deployed.
- By default the site will be named WebSite1, but you can change this to anything.

Add a Web Form
- Right-Click “WebSite1” Project
- Add, Add New Item
- Choose Web Form
- The default name will be Default.aspx
- Click Add.

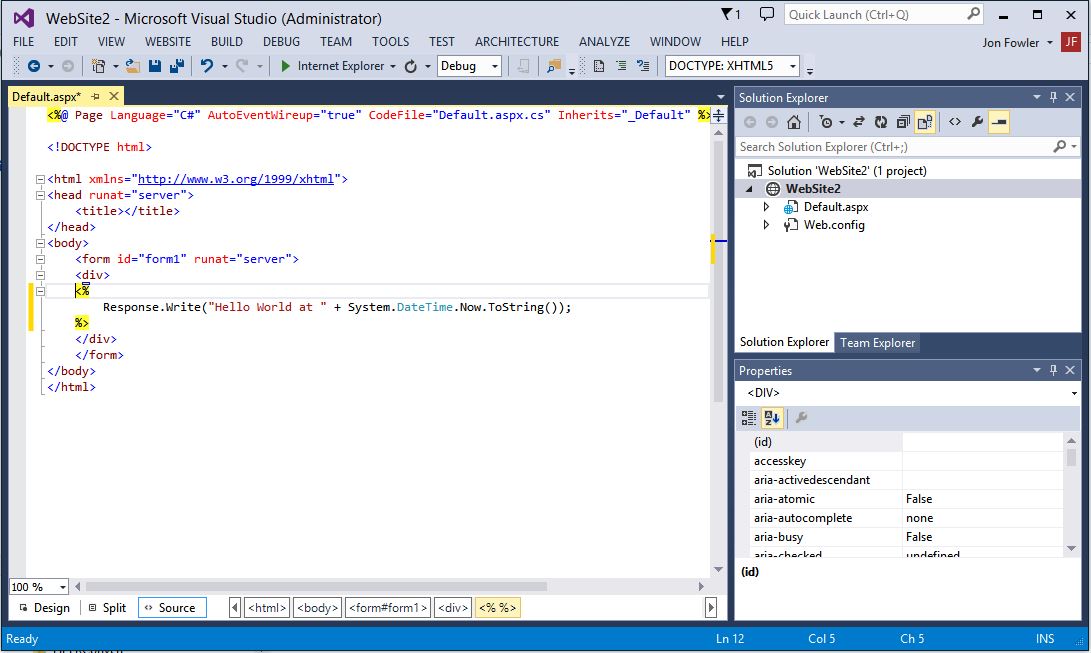
Add code to Default.aspx
- After you add Default.aspx it should bring up the Source Window by default.
- If the source code window is not up double click in the Solution Explorer on Default.apx, then on the tabs on the bottom choose Source
- We will be adding code to the Web Form that displays the current date and time so we can tell if the page is loading correctly
- Between the <div> and </div> tags add the following C# code
- <% Response.Write(“Hello World at ” + System.DateTime.Now.ToString()); %>
- For the sake of auto updating the page to demonstrate AppDynamics we will add auto refresh to the page by adding this between the <head> and </head> tags:
- <meta http-equiv=”refresh” content=”5″ />
Run the Web Site
- Hit F5 to open and run Default.aspx
- Text similar to the following should be displayed:
- Hello World at 9/25/2014 2:40:32 PM
- If the auto-refresh was added as described above it should update every 5 seconds.
- To stop the application close the browser or in Visual Studio in the Debug menu choose Stop Debugging (Shift + F5)
Publish the Web Site
- Right-click on the project in Visual Studio Solution Explorer and choose Publish Web Site
- Choose “Custom” and give it a name such as WebSite1
- In Connection, Target Location choose a file system location such as c:\temp\www\WebSite1, or anyplace you want to put it.
- Now when you click Publish it will copy the needed files to the location you specified in the previous step.
- The web site is not ready to run yet on its own, we need to configure it in IIS Manager.
Configure in IIS Manager
- Start IIS Manager
- There are many ways to do this, but I am going to describe the simplest method of creating a virtual root under the Default Web Site. If you are experienced in managing web sites then you can do this a different way.
- Right click on the Default Web Site
- Choose Add Virtual Directory…
- Provide an Alias such as WebSite1
- Provide the same Physical path as was used for publishing the web site, then choose Ok
- From the Windows command prompt run the following command to enable ASP.Net.
- dism.exe /online /enable-feature /all /featurename:iis-aspnet45
- Test your website by going to http://localhost/WebSite1 (or whatever you named the web site) and it should load Default.aspx
Viewing Results in AppDynamics
- If you already ran the AppDynamics Agent it should have picked up the Default Web Service which WebSite1 is a virtual root of, so we should not have to configure anything else.
- Make sure http://localhost/WebSite1 is loaded in the browser
- Go to http://localhost:8080/controller and click on Application1 and there should now be a Default Flow Map
- If you are not seeing any traffic, run the AppDynamics Agent again to make sure it picked up the Default Web Service.
Conclusion
We just made our first example of creating a .Net web site and monitoring it with AppDynamics. You can now navigate around in the AppDynamics UI to view the performance of your site. In another blog post I will demonstrate adding a database and some SQL code to our site so that we can demonstrate the Database Agent, or other components.