This tutorial is designed to explain and demonstrate the downloading, installation, data loading, and use of the virtual table server (VTS). It is intended for use by experienced HPE LoadRunner users who have a working knowledge of HPE LoadRunner parameters and the C programming language, as it is commonly used for HPE LoadRunner scripting.
VTS Utility
VTS is a web-based application that works with Vuser scripts. VTS offers an alternative to standard VuGen parameterization. When you use standard parameterization, each Vuser is assigned parameter values from a dedicated set of values from a data file. Parameter values are not shared between Vusers. In contrast, the VTS enables you to assign parameter values from a single set of parameter values to multiple Vusers and multiple scripts. This may enable you to more accurately emulate a real-user environment. Using the VTS as the source for your parameter data, you are able to:
- Work with Vuser scripts, offering an alternative to standard HPE LoadRunner parameterization.
- Import parameter values into a tabular format.
- Provide a centrally located single source for all parameter data associated with all the scripts in a testing project. You can support multiple projects by using multiple VTS instances from a single VTS.
- Automatically generate test data, both before a performance test begins and during the actual execution of a test scenario. You can use VuGen scripts to fully automate parameter data creation. One script can consume data from the VTS and then write new data back to the VTS for use by other scripts. For example, you could do the following:
- Create new user accounts and write the user data to the VTS.
- Use the new user data as log-in accounts to your application. These users could then make reservations from VTS-stored reservation entities.
- Use the reservations to process customer check-ins and then store that information in the VTS.
- Use the checked-in data to provide checkout data and clear reservation entities.
- Use the checkout data to create billing actions.
- Provide API calls that give you full control over the data contained in the VTS. You can use and remove entries from the VTS with a single call. You can use data from the VTS and then put the data back in the VTS and the end of a table (circular queue). You can ensure unique data. There are many ways to manage your parameter data with the VTS. The VTS API provides a rich set of functions that grant you full control over your parameter data. Your only limit is your own imagination.
The VTS is composed of two components, the client and the server. The client is a set of API functions that are used to access data in the server. Because the VTS API functions integrate with VuGen, there is no need to install a separate client.
The server includes table data that contains parameter values that can be used by your Vuser scripts. The VTS table is composed of columns and rows. Each column represents a set of values that can be assigned to a specific parameter or parameters in your Vuser scripts. The cells within a column contain the actual values that are assigned to the parameter.
For more information on add-ins, see the “Installing Additional Components” section of the HPE Performance Center\LoadRunner installation guides.
1. Downloading
The VTS version 12.53 can be downloaded from HPE support. The same version is used for both HPE Performance Center and LoadRunner, as long as they are in version 12.53. The VTS software resides in the “Additional Component” subdirectory of both the HPE LoadRunner and Performance Center installation packages.
2. Installation/Setup
To install the VTS:
- Run the appropriate VTS setup.exe file (SetupVTSServer.exe that is located in the Additional Components folder in the installation media). The VTS Setup Wizard opens, displaying the welcome page.
- Follow the online instructions to complete the VTS installation.
Note: At the end of the installation process, a shortcut for VTS is created and added to your desktop. This shortcut gives you access to the VTS UI on the local machine. If you change the port that is used to access the VTS UI, you must manually update the URL property of the shortcut.
If you are unable to access the VTS UI, make sure that the VTS service is started. To start the VTS service, go to Control Panel > Systems & Security > Administration Tools > Services. Right-click VTS Service and select Start.
The Installation Process
After clicking on the appropriate version of the VTSSetupServer.exe, the following screen will be displayed: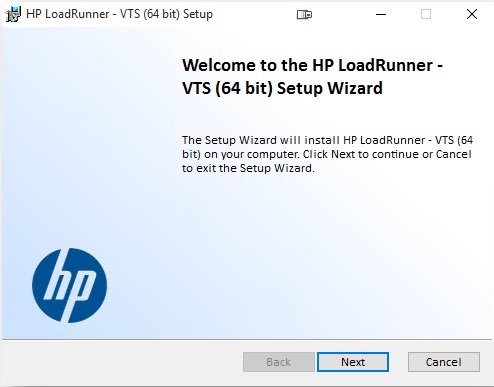
Click the Next button and the Install Shield dialog is presented.
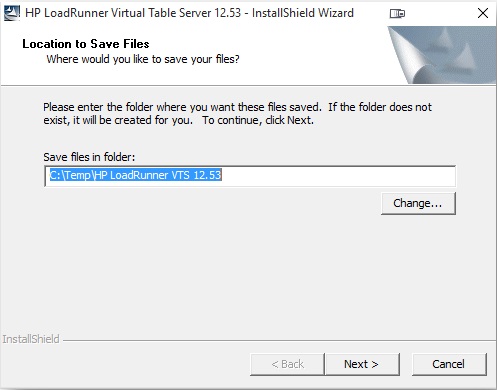
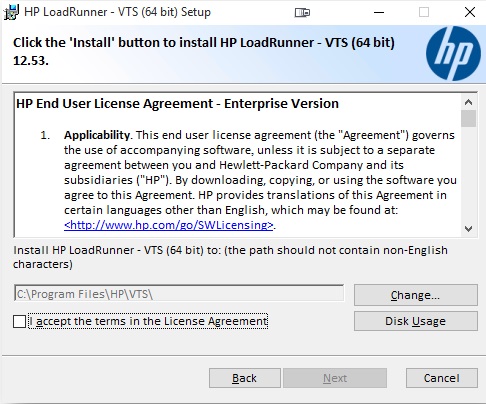
Accept the default save location and click on the Next button, and you will see the End User License Agreement. You must accept the license agreement to continue. From this screen, you may also change the installation directory and check your disk usage. To continue, accept the license agreement and click on the Next button.
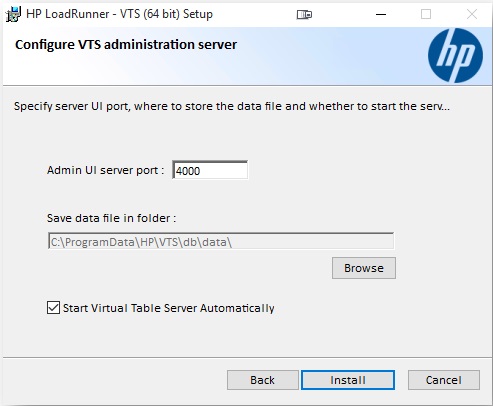
The Configure VTS administration server dialog will be presented. On this screen, you should do the following:
- In the Admin UI sever port Edit box (1), enter the port number that you wish to use when performing administrative tasks on the VTS. The default is pre-populated at port 4000.
- In the Save data file in folder (2) field, either accept the default location or click on the Browse button and select an appropriate file location.
- In the Start Virtual Table Server Automatically (3) checkbox, select the checkbox to have the VTS automatically start each time the platform is rebooted.
- When the items on this dialog are complete, click on the Install button (4) to proceed with the installation.
After successfully installing the VTS files, the following dialog will be presented. If you wish to review the Installation log, select the appropriate checkbox and then click on the Finish button to complete your installation.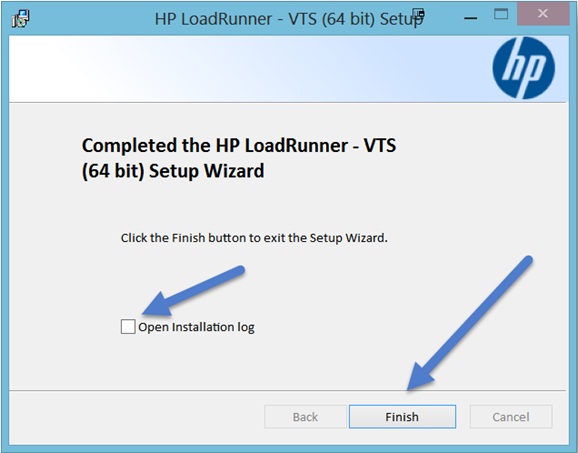
Upon completion of the installation process, your default web browser will be invoked and you will be able to view the VTS admin user interface. From this interface, you can view and manage the data in your VTS tables. Please note the API Access Port. This is the port that you will use in every script that accesses the VTS. Please note that the URL in the browser takes the form https://localhost:4000/#. You can only use this URL when accessing the VTS from the platform where the VTS is physically installed. You will need to substitute your VTS name or IP address in place of localhost to access the VTS remotely.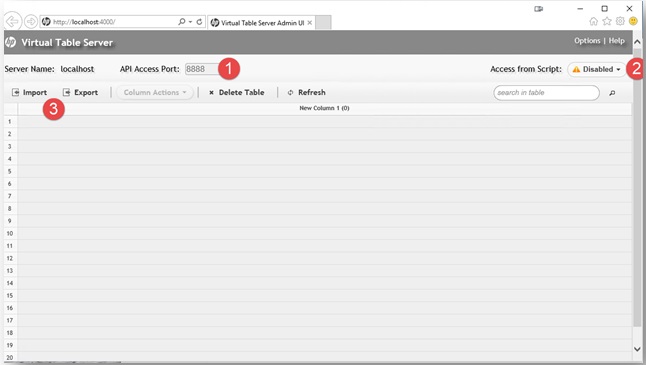
Your next task will be to enable script access to the VTS. Script access to the VTS is configured on a different port than the port used for administrative access. Script access to the VTS is enabled by clicking on the Access from Script pul-ldown and selecting Enable.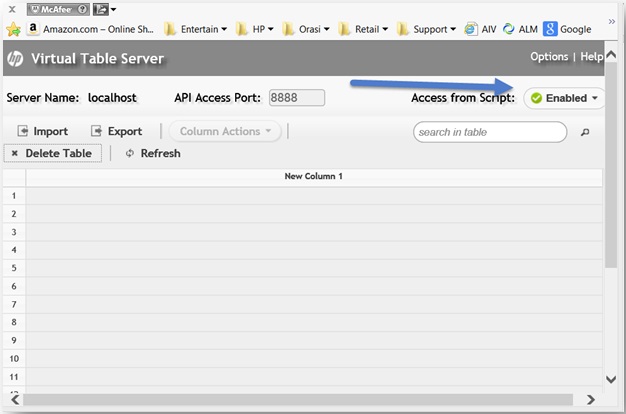
Multiple Instances
With the current version of the VTS, you are now able to run multiple instances of the VTS from a single VTS. To accomplish this task, click on the Options link in the VTS UI. This allows you, for example, to have a separate VTS instance for each project or separate application under test.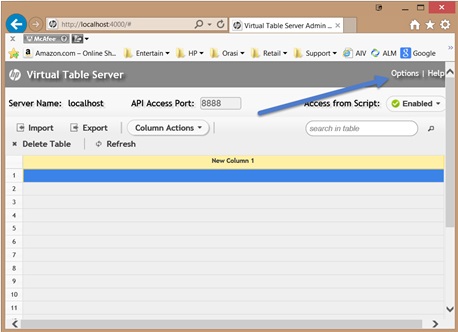
This action will invoke the display of the Options dialog. In the Options dialog, click on the Other Instances link.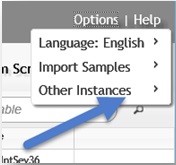
Select Start Instance to continue.
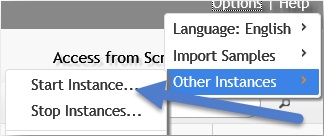
This action will invoke the display of the “Start Instance” dialog.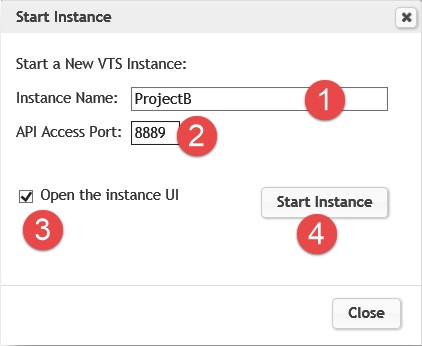
In the Start Instance dialog, do the following:
- In the Instance Name field, enter a name for your new instance.
- In the API Access Port field. Enter a port number that will be used by your scripts. This must be a different port from the one used for the Main Instance.
- If you wish to view the UI for your new instance, select the Open the instance UI checkbox.
- Click the Start Instance button.
The VTS (New Instance Name) UI will be displayed. Note that the API Access Port field will contain the port number entered in step 2 above.
Now that you have multiple instances running, you will use the Options pull-down from the VTS UI to switch back to the Main Instance and manage Other Instances, as shown below.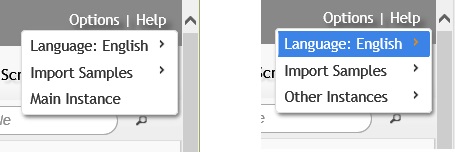
Now that your VTS is operational, you can import comma delimited data files (.csv) directly into the VTS, or you can create scripts that will load the VTS table with your test data.
3. Data Loading
The following details how to load data into the VTS using two methods. The first is via .csv files and the second is through the use of HPE LoadRunner scripts that create and load the data columns.
Comma Delimited File Data Format and Use
The VTS stores data in columns and rows, much like a spreadsheet. When you access the VTS either for retrieval or data insertion, you will access the VTS via individual column names. For example, for an airline, you would need columns for such data items as customers, flights, ticket prices, itineraries, etc. You could create individual columns for each of the fields within a required data structure; however, that is very inefficient.
When using the VTS, it is better to store data in columns that represent a complete record. For example, the customer column should contain the name, address, phone numbers, and accounts for each customer. You handle this by creating a composite record that is stored in a single column. In the customer column, your composite record might look something like this:
Customer Column
367598AA623:David:A:Marks:11022 Any Street:Jacksonville:FL:32219:904 555-1212:904 555-8585
When data is stored as a composite record, you can use a single I/O operation to extract all the customer data that you will need in your script. To use the data, you will have to create a function within your script that breaks this data into its individual components and then places these individual data components into HPE LoadRunner parameters. A sample script that illustrates how to extract and break this data is included with this VTS tutorial.
The steps to create this data via a .csv file involve just creating a spreadsheet using a program like Microsoft Excel. In the spreadsheet, create a single column for each desired data record similar to the following example.
In this example, we have composite records for both the customer and tickets. Note that each column is independent and you can have as many records in each column as needed.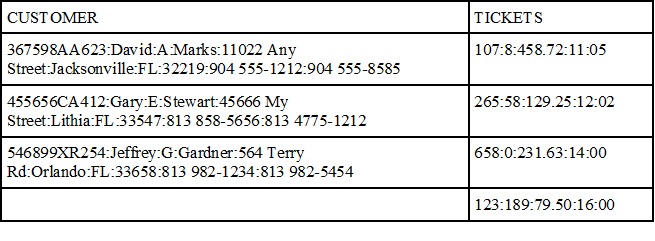
Once you have created the data in your spreadsheet, save the spreadsheet as a .csv. Then use the following steps to import the data.
Importing Data into the VTS from Comma Delimited Files
Access the VTS by entering the URL of the VTS Admin Site using the following format: http://[system_name or IP]:VTS Port. For example:
http://vts_serv_01:4000
This will display the VTS in your web browser. To begin the import of data from a .csv file, click on the Import link.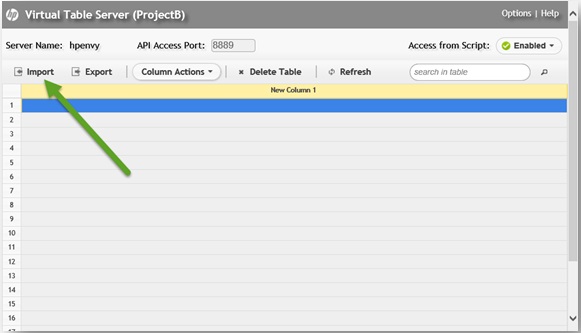
This will invoke the Import panel. In this panel, you can load data directly from a database using a connect string and an SQL statement. For the purpose of this tutorial, we will be uploading from a .csv file. Select the Import from CSV file radio button, then use the Delimiter pull-down, and select the appropriate delimiter. Normally, this will be commas. Next, click on the Browse button.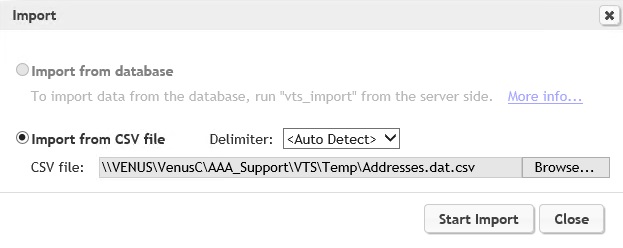
The Choose File to Upload dialog box will be displayed. Navigate to and select the .csv file you plan to upload. Next, click on the Open button to begin the import.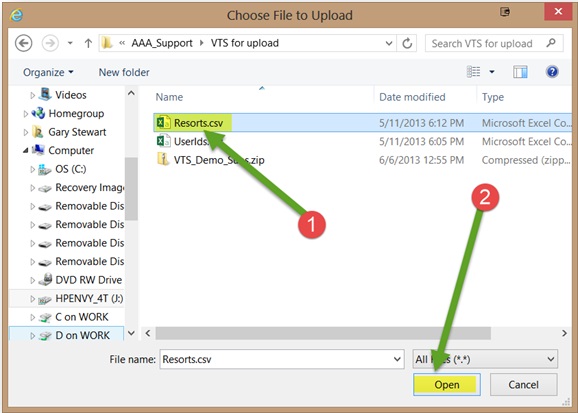
The Open File dialog will disappear, and you will be back at the Import dialog box. Click on the Start Import button to perform the import.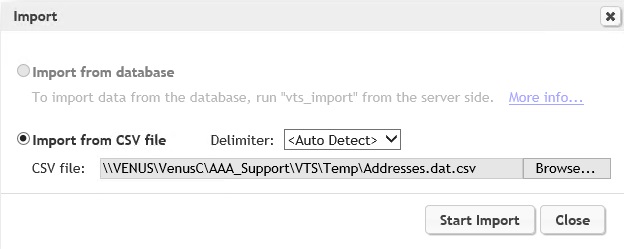
If your .csv file was properly formatted, the data will be imported directly into your VTS, and you will see the Message pop-up box with the notice: “The data import was successful.” Your VTS is now ready for data access from your scripts.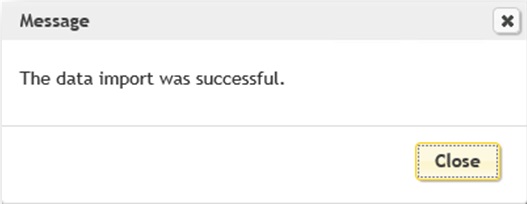
Creating VTS Data Using VuGen and an HPE LoadRunner Script
A second way to import data into your VTS is by using VuGen to build a script that will create the data that you need for your testing. A sample script is included with this tutorial. The script is named VTS_12_53_BuildData_Demo and fully commented so that you should be able to understand everything that is happening as the VTS test data is created.
This script demonstrates how to connect to the new VTS version 12.53, and then creates a new data column in the VTS table. It will then create a composite data record in the VTS during each iteration. This script is capable of creating 10,000 records in less than 30 seconds on a quad core Intel I7 processor. By modifying the record structure, you should be able to use this script to load the VTS for your testing needs. This script has tested up to 300,000 records without error. The number of iterations controls the number of records created.
The data record is comprised of account number, first name, middle initial, last name, address, city, state, zip code, home phone, and work phone.
Each data element is separated by a “:”
Example VTS Record:
5454985555555:Stewart:E:Gary:11022 Klingon Way Apt 603:Lithia:FL:33547:813 555-5555:813 444-4444
When creating your own VTS data loading scripts, you must modify the record structure to match you own data needs.
Please note that the VTS is extremely fast. When you run the data read demo, it will finish in under one second, even if running five iterations. Please check the script output before thinking that the script did not run correctly.
Note: The data build demo is intended to work in a VTS where the column name does not exist. Please delete the table before you attempt a second run or remove the abort code in the script that shuts this down if data already exist.
4. Accessing the VTS
If you have a VTS that is up and running and contains test data, then you are ready to begin using this data in your scripts. As VTS data is read into your script, using the VTS API functions, the data is converted to HPE LoadRunner parameter data. As such, every time you perform any action on the data, it must be treated as parameter data. This means that you can use the data as a standard parameter in your server requests and can access the string component of the data using the lr_eval_string() function.
A sample script in included with this tutorial page named VTS_12_53_DataRead_Demo. This script is fully commented, so that you should be able to understand everything that is happening as data are read and processed.
Please note the VTS is extremely fast. When you run the data read demo, it will finish in under one second, even if running five iterations. Please check the script output before thinking the script did not run correctly.
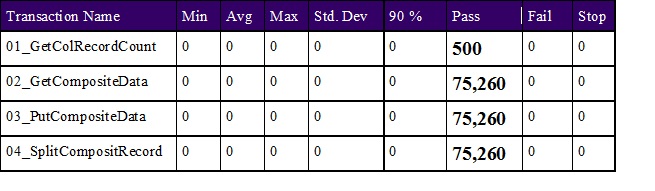
VTS Performance Test Results
The following are the performance test results of the VTS running the two scripts provided with this blog:
| Analysis Summary | Period: 21/04/2015 11:31:10 – 21/04/2015 12:03:16 | ||
| Scenario Name: | Scenario1 | ||
| Results in Session: | Y:\AAA_Support\VTS\VTS Test Results\RawResults\res24.lrr | ||
| Duration: | 32 minutes and 6 seconds. | ||
Statistics Summary
| Maximum Running Vusers: | 500 |
Transaction Summary
| Transactions: | Total Passed: 226,280 | Total Failed: 0 | Total Stopped: 0 | Average Response Time |
Average Transaction Response Time
|
Graph data in Excel format |
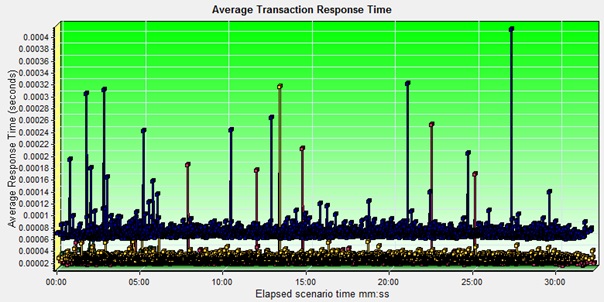
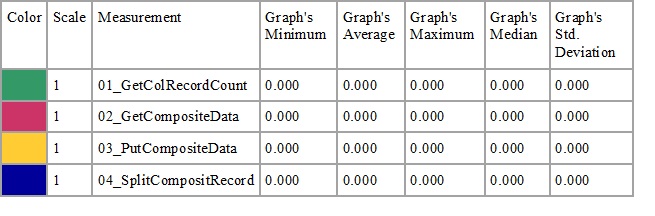 Description: Displays the average time taken to perform transactions during each second of the load test. This graph helps you determine whether the performance of the server is within acceptable minimum and maximum transaction performance time ranges defined for your system.
Total Transactions Per Second
|
Graph data in Excel format |
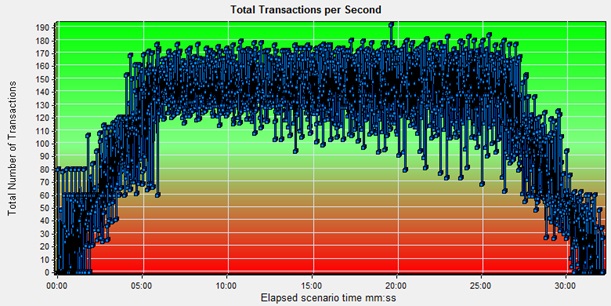
 Description: Displays the total number of completed transactions (both successful and unsuccessful) performed during each second of a load test. This graph helps you determine the actual transaction load on your system at any given moment.
VTS CPU
|
Graph data in Excel format |
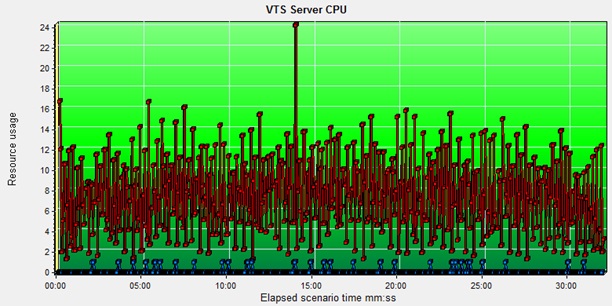
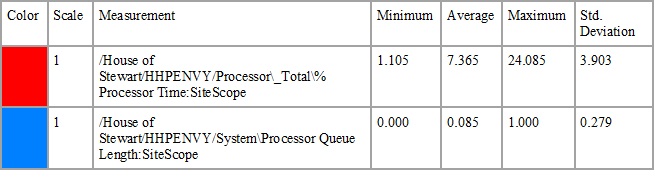 Description: Displays measurements reported by SiteScope.
VTS Disk Activity
|

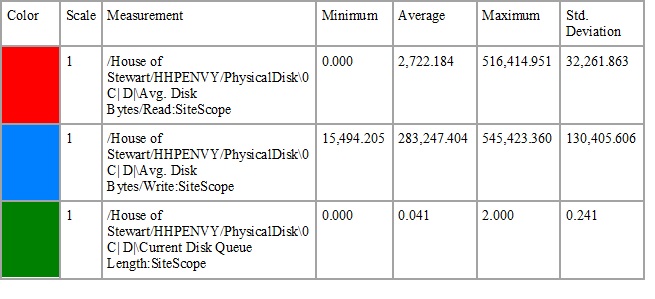 Description: Displays measurements reported by SiteScope.
VTS Memory
|
Graph data in Excel format |


Description: Displays measurements reported by SiteScope.
Please make a post with TOP 10 reasons to get a dedicated vs vps server!
Riki, I’ll discuss this with the team and see if we can do so. Thank you for your request.