Introduction
In general terms, the Test Data Matching process finds existing information in our database systems, mostly in production environments, which will be very useful for finding efficient and accurate test data. At the same time, it helps us save time and effort in creating new information from scratch.
Several systems have been designed to use centralized information. But very often client data systems are disparate, so it’s complicated to get all related information in just one place in a single shot. With this, we need to rely on federated database concepts, which has been very useful in bringing information from different RDBMS systems in the same instance.
As will be discussed, Datamaker has implemented a simple solution for these kinds of challenges. The use of federated views is a simple way to design our Test Data Matching process.
Scenario
Let’s think about the following scenario. Imagine there is a large client, their QA TDM team has been required to look for existing information for two development teams. Each team has different data models on different servers for each of their systems. And, as if this were not enough, they are not allowed to generate objects, such as views or cubes into their Databases, because security policies, of course all are managed by DBAs.
When the TDM team makes a thorough analysis of the requirements, the need becomes clear to implement federated tables to get information from the two different databases. At first glance, it would seem complicated because it is not possible to create database objects due of security policies.
At first glance, it would seem complicated because it is not possible to create database objects due of security policies.
Using Datamaker
The QA team has decided to use Grid-Tools DataMaker for Test Data Matching. One of Datamaker’s capabilities that personally struck me, is the ease with which DataMaker uses several connections for different databases (even, different servers) in just one session in order to get federated information in one shot. Of course, I strongly recommend, before you start using Datamaker to get a full analysis of the schemas to ensure that all required information is there. It means to identify; fields, tables, schemas and primary keys.
Once we have defined the fields, we can begin to use Datamaker. The first thing to do is setup two important things: profiles and views.
Profiles: Firstly we need to generate connection profiles for each involved database. You need to have a tnsnames file or ip, port and instance name.
Views / Objects registered: In this scenario, where we cannot generate tables nor views in our databases, we can take advantage of creating objects directly in DataMaker and use them as customized views. I think the easiest way is using CSV files because you only have to enlist all your fields, and import it to Datamaker as a simple table. However, you have to take special care to indicate the right formats and lenghts.
Ok, once we have already prepared all our information, we can continue with the Test Data Matching process! Basically, we need to build the following set of Datamaker Datapools.
- Generator Datapool: HHere, we must to use the view already generated and we have to indicate the data source for each field. To do so, there is a function called sqllist that allows us to provide the correct profile. Moreover, we could use SQL statements, to relate primary keys with the rest of fields.
@seqlov(percnull,@sqllist(connection,sql)@)@
This might be the focal point in our process. Datamaker allows us to connect to any database at same time and bring information into our table. All in real time.
- Container Datapool: Once we have designed our Generator, we shall publish the Generator into the Container. This means to run our process and get the information into our view. At the end, we can see real information in our datapool.
- TestMatch Datapool: Finally, once we have all desired information in our Datamaker instance, we can apply our test conditions and see which information serves us well for each test case.
Example
Let’s create a simple example about building Federated views with Datamaker using our scenario conditions.
Let’s say we have two different databases on separate servers: Travel and Creditcards. We need to know whether creditcard data exists in both Travel and Creditcards databases and we need to know if those are Amex debit or credit cards, between our first 1000 users.
So, let’s analyze our databases. We can see that this information could be brought from the tables CARD_ACCOUNT from Creditcards system, and CREDIT_CARDS from Travel system:
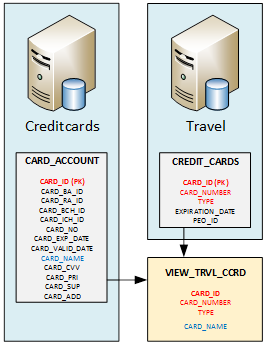
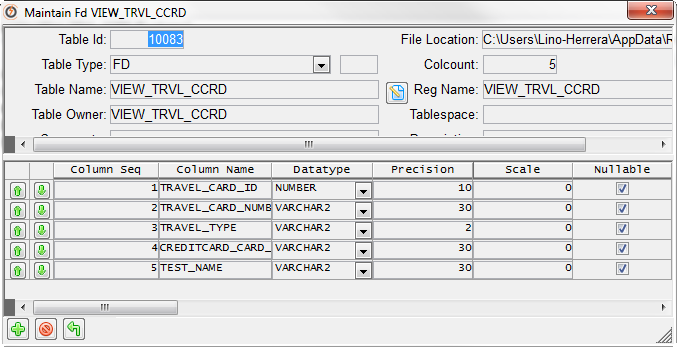
Once we have identified our datasource, we need to create our VIEW_TRVL_CORD view in Datamaker. Remember, we are not allowed to create any database object. In order to use DM objects as a view, I did use a CSV file with all fields and I registered it as a table in Datamaker. I had to adapt data types and precision for each field. And finally, for Test Data Matching purposes, I’ve added one field called TEST_NAME.
Right, now we are ready to begin with our Data Matching process. Let’s create our set of Datapools: Generator, Container and TestMatching pool.
Generator:
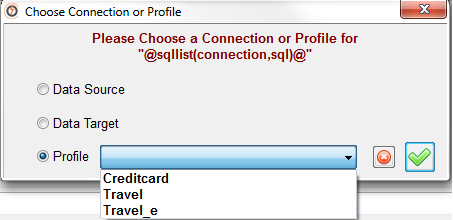
Prior, we need to identify our existing profiles:
Using this information, we can then setup our seqlov function. Take a look at the following used definitions for each field:

Can you see sqllist function? This function uses two parameters. ‘Connection’ and ‘SQL sentence’. Let’s analyze how to use them.
- Connection: We must to choose the profile to use. Since we are pointing to two different DB’s (Travel and Creditcard), we need to indicate which database we need to get information from.
- For TRAVEL_CARD_ID, TRAVEL_CARD_NUMBER and TRAVEL_TYPE fields, we use “Travel” profile (the first character ‘P’ indicates which kind of connection we are using, P = Profile, indeed).
- @sqllist(PTravel, …
- For CREDITCARD_CARD_NAME, we use “Creditcard” profile.
- @sqllist(PCreditcard, …
- For TRAVEL_CARD_ID, TRAVEL_CARD_NUMBER and TRAVEL_TYPE fields, we use “Travel” profile (the first character ‘P’ indicates which kind of connection we are using, P = Profile, indeed).
In this way, we are constructing a federated view, in real time!
- SQL Sentence. For this parameter, we indicate which information we need to get. Please take a deep look into each one. As you can see, we are using our primary key ‘TRAVEL_CARD_ID’ like a pivot to get information for the rest of fields.
Container
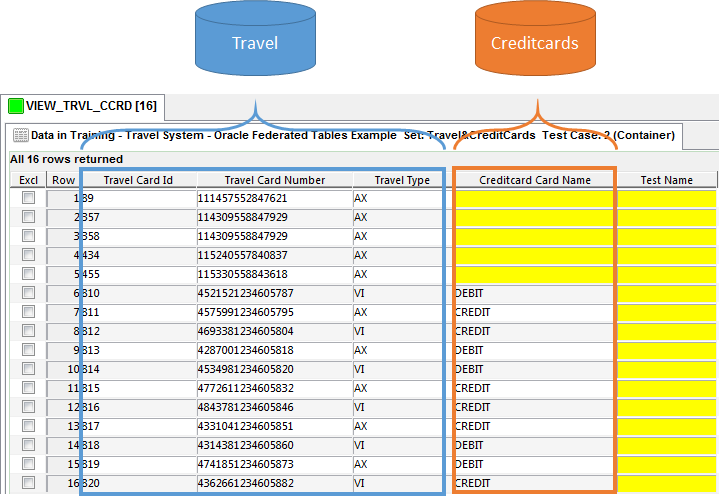
Now we only need to execute our Generator functions into our Container. In the following image, we can check out our information already extracted from our databases. As we can see, we got CREDITCARD_CARD_NAME information from Creditcard database. At the end, we see our TEST_NAME field which will help us to know which cards are helpful for our test cases.
Test Matching Datapool
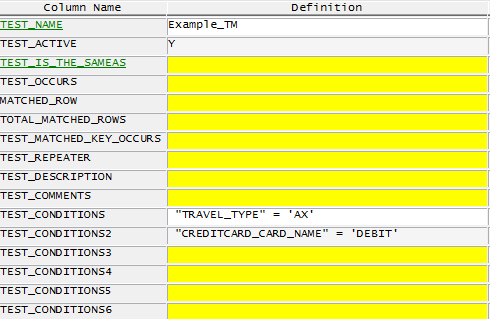
Finally we can write our conditions into our TM Datapool. We need both Amex cards and Debit cards. Please take a look at the definition of each condition:
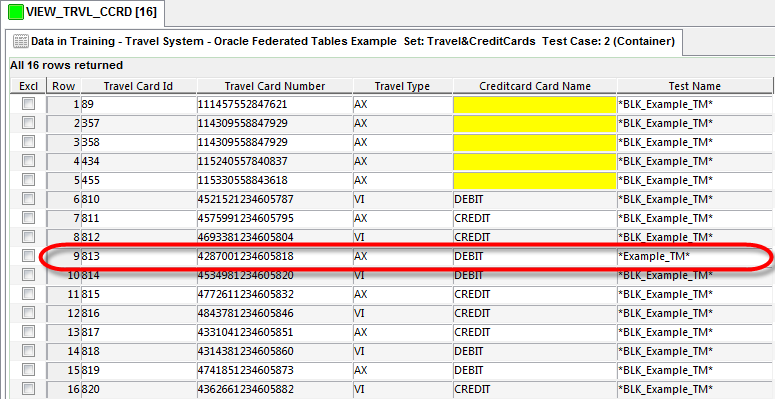
Once that our Test Matching process has been executed, you can see the results in a web page.

Our batch process has marked the registers that matches our conditions in Container datapool. This information is exactly what the Testing team was looking for, they now know that there is test data that could be used instead of creating it from scratch. We have saved time and effort for all teams! Of course, this could be extrapolated and get more test data with different conditions.
Conclusion
As you can see, this is a very effective way to get information on a single instance from different data sources, in a very easy way. This is useful for customers with information distributed in various RDBMS as Oracle, SQL Server, DB2, etc. We may collect information and know whether we have consistent test data in our systems, in such a manner the Testing teams can be provided with functional test data without spending time creating new information from scratch.